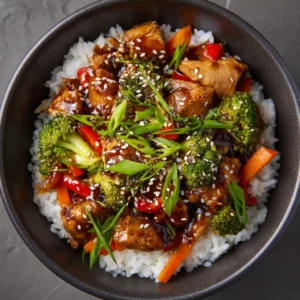
Welcome to the only Teriyaki Chicken Stir Fry recipe you’ll ever need. Forget those disappointing, watery takeout sauces and say hello to a vibrant, satisfying meal that looks exactly like it does in your favorite food photos. We’re talking tender, pan-seared chicken bites enveloped in a thick, impossibly glossy, dark brown teriyaki sauce. This isn’t just dinner; it’s a masterpiece in a bowl, built on a foundation of fluffy jasmine rice and bursting with crisp, colorful vegetables. The secret is in the technique, and I’m going to walk you through every step to recreate this stunning dish in your own kitchen.
This recipe is designed for enthusiastic home cooks who appreciate the details. We will achieve that perfect visual harmony: the bright green of steamed broccoli, the sharp orange of diagonal-cut carrots, and the subtle char on sweet red bell peppers. Every element is crafted to match that coveted, unedited, “handheld smartphone photo” aesthetic—a truly honest and delicious meal.
 1")
Why This Recipe Delivers That Perfect Takeout-Style Bowl
This isn’t just another stir-fry recipe. It’s a blueprint for perfection, engineered to deliver on both flavor and visual appeal. Here’s what sets it apart:
- The Sauce is Everything: We’re making a teriyaki sauce from scratch that becomes a thick, luscious glaze. It has a rich, dark brown sheen that clings to every piece of chicken, exactly as you see in the photos.
- Texture, Texture, Texture: You’ll experience a symphony of textures. The tender chicken, the fluffy rice, the crisp-tender vegetables, and the final crunch of toasted sesame seeds. Nothing is soggy or overcooked.
- Vibrant, Charred Veggies: We’ll use specific techniques to ensure the broccoli stays bright green, the carrots have a slight bite, and the red bell peppers achieve a beautiful, flavorful char without becoming limp.
- A Complete, Balanced Meal: This dish has it all—lean protein, wholesome grains, and a generous serving of fresh vegetables, making it a satisfying and well-rounded weeknight dinner.
The Building Blocks of a Flawless Teriyaki Stir Fry
The quality of your final dish starts with the ingredients. We’re using a specific combination to achieve that picture-perfect result.
For the Star of the Show: The Chicken
- Chicken Breast: You will need 1.5 lbs (680g) of boneless, skinless chicken breast. Cutting it into uniform, bite-sized pieces ensures it cooks quickly and evenly.
- Cornstarch: We’ll use 1 tbsp (8g) to coat the chicken. This is a non-negotiable step for creating a golden-brown crust and helping the teriyaki sauce cling beautifully.
- Avocado Oil: About 2 tbsp (30ml) of a high-smoke-point oil is crucial for searing. Avocado, canola, or grapeseed oil work perfectly.
- Salt & Black Pepper: These foundational seasonings, about 1/2 tsp (3g) of each, are essential for bringing out the chicken’s natural flavor from the very first step.
For the Legendary Glossy Teriyaki Sauce
- Low-Sodium Soy Sauce: The base of our sauce, you’ll need 1/2 cup (120ml). Using low-sodium gives us control over the final saltiness.
- Mirin: This Japanese sweet rice wine, 1/4 cup (60ml), provides a subtle sweetness and authentic flavor.
- Sake: You’ll use 2 tbsp (30ml). It adds depth and complexity, but you can substitute with chicken broth if needed.
- Brown Sugar: We use 1/4 cup (50g), packed. It’s essential for the sauce’s sweetness, color, and caramelization.
- Fresh Ginger & Garlic: Do not substitute with powder! 1 tbsp (6g) of freshly grated ginger and 2 minced garlic cloves provide an aromatic punch that defines the sauce.
- Cornstarch Slurry: The magic trick for a thick, glossy sauce. A simple mixture of 1 tbsp (8g) cornstarch and 2 tbsp (30ml) cold water.
For the Vibrant Vegetable Medley & Base
- Jasmine Rice: You’ll need 1.5 cups (280g) of uncooked jasmine rice. Its fragrant aroma and fluffy texture create the perfect foundation.
- Broccoli Florets: About 2 cups (200g) of fresh, bright green florets. We’ll steam them perfectly to maintain their crispness and color.
- Carrots: Two medium carrots, peeled and sliced thinly on the diagonal. This cut not only looks professional but also helps them cook quickly.
- Red Bell Pepper: One medium pepper, cut into thin strips. We’ll cook this at high heat to achieve those delicious charred edges.
For the Finishing Touches
- Toasted Sesame Seeds: About 1 tbsp (9g). Toasting them in a dry pan for a few minutes unlocks a wonderfully nutty aroma and flavor.
- Green Scallions: Thinly sliced for a fresh, mild oniony bite and a pop of vibrant green color as the final garnish.
 2")
Essential Tools for Stir-Fry Success
You don’t need a professional kitchen, but a few key tools will make achieving the perfect Teriyaki Chicken Stir Fry much easier.
- Large Wok or Skillet: A 12-inch (30cm) or larger skillet is essential. You need enough surface area to sear the ingredients without overcrowding the pan, which would cause them to steam instead of brown.
- Saucepan: A small saucepan is needed for preparing the teriyaki sauce and another for steaming the rice.
- Sharp Chef’s Knife: Crucial for prepping the chicken and vegetables into their precise shapes and sizes.
- Mixing Bowls: You’ll need a few for tossing the chicken with cornstarch, mixing the sauce, and holding your prepped veggies.
Bringing Your Teriyaki Chicken Stir Fry to Life
Follow these steps closely, paying attention to the sensory cues. The process is just as important as the ingredients.
Step 1: Master the Fluffy Jasmine Rice Foundation
First, rinse your 1.5 cups (280g) of jasmine rice under cold water until the water runs clear. This removes excess starch and is the key to fluffy, distinct grains. Combine the rinsed rice with 2 1/4 cups (530ml) of water in a medium saucepan, add a pinch of salt, and bring to a boil. Once boiling, reduce the heat to the lowest setting, cover tightly, and let it simmer for 15 minutes. Do not lift the lid! After 15 minutes, remove from heat and let it stand, covered, for another 10 minutes before fluffing with a fork.
Step 2: Crafting the Legendary Glossy Teriyaki Sauce
In a small saucepan, combine the 1/2 cup (120ml) soy sauce, 1/4 cup (60ml) mirin, 2 tbsp (30ml) sake, and 1/4 cup (50g) brown sugar. Add the freshly grated ginger and minced garlic. Whisk together and bring to a gentle simmer over medium heat, stirring until the sugar dissolves completely. In a separate small bowl, mix the 1 tbsp (8g) of cornstarch with 2 tbsp (30ml) of cold water to create your slurry. While whisking the sauce, slowly pour in the slurry. Continue to simmer for 1-2 minutes, whisking constantly, until you see the sauce thicken to a glossy, syrup-like consistency that coats the back of a spoon. Remove from heat and set aside.
Step 3: Prepping the Vibrant Vegetables and Chicken
While the rice cooks, prepare your other components. Pat the chicken breast dry and cut into 1-inch (2.5cm) bite-sized pieces. In a bowl, toss the chicken with 1 tbsp (8g) cornstarch, 1/2 tsp salt, and 1/2 tsp black pepper until evenly coated. Next, lightly steam your broccoli florets for 2-3 minutes until they turn a vibrant green but are still very crisp. You can do this in a steamer basket or by blanching them in boiling water. Immediately rinse with cold water to stop the cooking process. Finally, ensure your carrots, bell pepper, and scallions are sliced and ready to go. Toast the sesame seeds in a dry pan over medium heat for 2-3 minutes until fragrant and lightly golden.
Step 4: The High-Heat Sear for Perfect Chicken and Veggies
Heat 1 tbsp (15ml) of avocado oil in your large wok or skillet over medium-high heat. The oil should shimmer. Add the coated chicken in a single layer, being careful not to crowd the pan (work in two batches if necessary). Let the chicken sear without moving it for 2-3 minutes, until a deep golden-brown crust forms. Flip and cook for another 2-3 minutes until cooked through. Remove the chicken and set it aside. Add the remaining 1 tbsp (15ml) of oil to the pan. Add the sliced carrots and bell pepper strips, stir-frying for 3-4 minutes. You’re looking for the peppers to get slightly blistered and charred in spots while the carrots become crisp-tender.
Step 5: The Final Assembly – Bringing It All Together
Return the cooked chicken to the skillet with the vegetables. Add the steamed broccoli florets. Pour that beautiful, glossy teriyaki sauce all over everything. Stir gently to coat every single piece. Let it all heat through for 1-2 minutes until the sauce is bubbling and everything is well combined. Your kitchen should smell incredible right now. To serve, spoon the fluffy jasmine rice into shallow bowls, top with a generous portion of the Teriyaki Chicken Stir Fry, and garnish with toasted sesame seeds and thinly sliced green scallions.
Pro Secrets for a Flawless Stir Fry Every Time
- Don’t Crowd the Pan: This is the most common mistake. Searing in batches gives your ingredients the space they need to develop a beautiful crust instead of steaming.
- Prep Everything First (Mise en Place): Stir-frying is a fast process. Have all your vegetables chopped, sauce mixed, and chicken coated before you even turn on the stove.
- Cold Water for Your Slurry: Always mix cornstarch with cold water. Adding it to hot liquid directly will create clumps.
- High Heat is Your Friend: A hot pan is essential for getting that perfect char on the vegetables and a good sear on the chicken, which adds layers of flavor.
- Don’t Overcook the Vegetables: The goal is crisp-tender, not mushy. The broccoli should be bright green and the carrots should still have a snap to them. For an even easier weeknight meal, try our delicious Crockpot Maple Dijon Chicken (coming soon).
How to Store and Reheat Your Teriyaki Masterpiece
This Teriyaki Chicken Stir Fry makes for fantastic leftovers. Store any extra in an airtight container in the refrigerator for up to 3-4 days. For the best results when reheating, use a skillet over medium heat with a splash of water or chicken broth to help loosen the sauce and gently steam the ingredients back to life. Microwaving works in a pinch, but the skillet method preserves the textures much better.
Perfect Pairings for Your Teriyaki Chicken
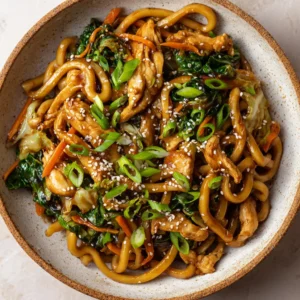
While this dish is a complete meal in itself, it also pairs wonderfully with other Asian-inspired flavors. Consider serving it alongside a refreshing Cucumber Shrimp Salad for a light and zesty contrast. For those who love bowl-style meals, this recipe serves as great inspiration for our equally delicious Teriyaki Chicken Bowl. If you want to explore another noodle dish, our Yaki Udon Recipe is a fantastic choice for another night.
Your Teriyaki Stir Fry Questions, Answered
Here are answers to some common questions to ensure your stir fry is a success.
Absolutely! Chicken thighs are a great alternative and will result in a more juicy, flavorful stir fry. They may take an extra minute or two to cook through, so ensure they reach an internal temperature of 165°F (74°C).
To prevent a soggy stir fry, ensure your pan is very hot, don’t overcrowd it (cook in batches if needed), and don’t overcook the vegetables. They should be crisp-tender. Also, make sure your sauce is thickened before adding it to the stir fry.
The secret to a thick and glossy teriyaki sauce is a cornstarch slurry. A simple mixture of equal parts cornstarch and cold water, whisked into the simmering sauce, will thicken it to a perfect glaze-like consistency in minutes.
For the best, most aromatic flavor, fresh ginger and garlic are always recommended. They provide a bright, pungent flavor that powdered versions can’t replicate. If you must use powder, use about 1/4 tsp of each.
This recipe uses broccoli, carrots, and red bell peppers for their color and texture. However, other great options include snap peas, mushrooms, onions, baby corn, and water chestnuts. The key is to cut them to a similar size for even cooking.
Printable Perfection: The Complete Teriyaki Chicken Stir Fry Recipe
Now it’s time to get cooking! This recipe card has the exact measurements and a condensed version of the instructions for you to follow along in the kitchen.
Ultimate Teriyaki Chicken Stir Fry (Picture-Perfect Recipe)
Ingredients
Equipment
Method
- Rinse the jasmine rice under cold water until it runs clear. In a saucepan, combine rice with 2 1/4 cups (530ml) of water and a pinch of salt. Bring to a boil, then reduce heat to low, cover, and simmer for 15 minutes. Remove from heat and let stand, covered, for 10 minutes before fluffing.
- In a small saucepan, whisk together soy sauce, mirin, sake, brown sugar, ginger, and garlic. Bring to a simmer over medium heat. In a small bowl, mix 1 tbsp cornstarch with 2 tbsp cold water to make a slurry. Slowly whisk the slurry into the sauce. Simmer for 1-2 minutes, whisking, until the sauce thickens and becomes glossy. Set aside.
- Pat chicken dry and toss with 1 tbsp cornstarch, salt, and pepper. Lightly steam broccoli florets for 2-3 minutes until bright green and crisp; rinse with cold water to stop cooking. Toast sesame seeds in a dry pan until fragrant.
- Heat 1 tbsp of oil in a large wok over medium-high heat. Add chicken in a single layer and sear for 2-3 minutes per side, until golden-brown and cooked through. Remove chicken. Add remaining 1 tbsp oil, then add carrots and bell peppers. Stir-fry for 3-4 minutes until crisp-tender and slightly charred.
- Return the chicken to the wok with the vegetables. Add the steamed broccoli. Pour the teriyaki sauce over everything and stir to combine. Cook for 1-2 minutes until heated through. Serve immediately over fluffy jasmine rice, garnished with toasted sesame seeds and sliced green scallions.
Notes
Prep Everything First (Mise en Place): Have all ingredients ready before starting as stir-frying is very fast.
Cold Water for Your Slurry: Always mix cornstarch with cold water to prevent lumps.
High Heat is Your Friend: Ensure your pan is hot before adding ingredients for the best sear and char.
Share Your Stir-Fry Success!
You did it! You created a visually stunning and incredibly delicious Teriyaki Chicken Stir Fry that rivals any restaurant. We know you’ll love the thick, glossy sauce and the perfectly cooked, vibrant vegetables. If you enjoyed making this recipe, we’d love to hear about it! Leave a comment below with your experience or any creative twists you added.
Don’t forget to share your beautiful creations! Pin this recipe on Pinterest to save it for later and share it with your friends and family. Happy cooking!
 4")