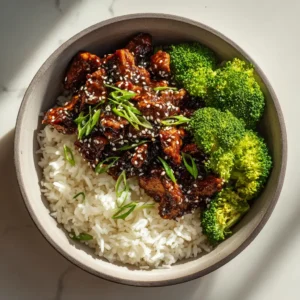
Forget the disappointing takeout. We’re about to create a Teriyaki Chicken Bowl that rivals your favorite Japanese restaurant, right in your own kitchen. Imagine a minimalist ceramic bowl filled with a foundation of perfectly fluffy rice, topped with incredibly tender, pan-seared chicken pieces. Each bite is drenched in a thick, sticky, and unbelievably glossy dark brown teriyaki glaze that you’ll want to bottle up and save.
This isn’t just a recipe; it’s a symphony of textures and flavors. You’ll see vibrant green, lightly steamed broccoli florets nestled next to the glistening chicken, all brought together with a generous scatter of toasted white sesame seeds and the fresh, sharp bite of finely chopped green onions. This is the Teriyaki Chicken Bowl you’ve been dreaming of.

Why This Bowl Will Become Your Weeknight Favorite
This isn’t just another dinner recipe. It’s a culinary experience designed to deliver maximum flavor with minimal stress. Here’s what makes this particular Teriyaki Chicken Bowl a game-changer:
- The Glaze is Everything: We’ve perfected the ratio of ingredients to create a teriyaki sauce that’s not watery or thin. It’s a thick, rich, and glossy glaze that clings beautifully to every single piece of chicken.
- Perfectly Balanced Textures: From the fluffy, soft bed of steamed rice to the tender-crisp broccoli and the juicy, seared chicken, every element has been chosen for a satisfying and harmonious mouthfeel.
- Visually Stunning Appeal: Following our guide, your final dish will look exactly like the photos—a beautiful, glistening bowl that’s as delightful to look at as it is to eat, thanks to key garnishes like toasted sesame and fresh green onion.
- Completely Customizable: This recipe is a perfect blueprint. Feel free to swap broccoli for bell peppers or add edamame. The core components are designed to be a flawless foundation for your culinary creativity.
The Anatomy of a Perfect Teriyaki Glaze & Bowl
The magic of this dish lies in using quality ingredients to build layers of authentic flavor. Here’s what you’ll need and why it matters.
For the Signature Teriyaki Glaze:
- Low-Sodium Soy Sauce (or Tamari): 1/2 cup (120ml) provides the savory, umami backbone of our sauce. Using low-sodium gives you better control over the final saltiness.
- Mirin: 1/4 cup (60ml) is a sweet Japanese rice wine that is essential for that authentic glossy sheen and a touch of sweetness.
- Sake (Optional): 2 tbsp (30ml) adds incredible depth and complexity, cutting through the sweetness. If you don’t have it, you can omit it.
- Brown Sugar: 1/4 cup (50g), packed. This provides the deep, molasses-like sweetness that caramelizes to help thicken the sauce and give it its signature dark color.
- Fresh Ginger: 1 tbsp (15g), finely minced. Its zesty, pungent heat cuts through the richness of the sauce.
- Fresh Garlic: 2 cloves, finely minced. Garlic adds a foundational aromatic flavor that complements the ginger perfectly.
- Cornstarch: 1 tbsp (8g) is our non-negotiable secret for a thick glaze. When mixed with water to create a slurry, it transforms the sauce from thin to perfectly viscous.
- Cold Water: 2 tbsp (30ml) to mix with the cornstarch. Always use cold water to prevent clumps.
For the Bowl Components:
- Boneless, Skinless Chicken Breast: 1.5 lbs (680g), cut into 1-inch (2.5 cm) bite-sized pieces. Chicken breast sears beautifully and acts as the perfect canvas for our powerful glaze.
- Avocado or Canola Oil: 1 tbsp (15ml). A neutral, high-smoke-point oil is crucial for pan-searing the chicken without burning.
- Kosher Salt and Black Pepper: To taste. These foundational seasonings are essential for bringing out the natural flavor of the chicken before the sauce is even added.
- Jasmine or Short-Grain White Rice: 1.5 cups (285g), uncooked. These varieties cook up to be perfectly fluffy and slightly sticky, ideal for a bowl foundation.
- Broccoli Florets: 1 large head, cut into bite-sized florets. Lightly steaming them keeps their vibrant green color and tender-crisp texture.
- Toasted White Sesame Seeds: 1 tbsp (9g) for garnish. Toasting them in a dry pan for a few minutes unlocks a wonderfully nutty aroma and flavor.
- Green Onions: 2 stalks, finely chopped, for garnish. They add a final touch of fresh, sharp flavor and a pop of color.

Essential Tools for Crafting Your Masterpiece Bowl
You don’t need a professional kitchen to achieve a restaurant-quality Teriyaki Chicken Bowl. Here are the essential tools that will guarantee success.
- Large Non-Stick Skillet or Wok: This is key for searing the chicken and combining it with the glaze without sticking.
- Small Saucepan: For gently simmering and thickening your homemade teriyaki glaze.
- Medium Pot with a Tight-Fitting Lid: Absolutely essential for steaming the rice to fluffy perfection.
- Whisk: For ensuring your teriyaki sauce ingredients and cornstarch slurry are perfectly smooth.
- Cutting Board and Sharp Chef’s Knife: For efficiently prepping your chicken, broccoli, and aromatics.
Bringing Your Teriyaki Chicken Bowl to Life: A Step-by-Step Guide
Follow these steps closely, paying attention to the sensory cues, to build your bowl layer by layer.
Step 1: Achieving Perfectly Fluffy Rice
First, rinse your rice in a fine-mesh sieve under cold water until the water runs clear. This removes excess starch and prevents gummy rice. Add the rinsed rice and 3 cups (720ml) of water to your medium pot, bring to a boil, then immediately reduce heat to the lowest setting, cover, and simmer for 15 minutes. After 15 minutes, turn off the heat completely and let it stand, covered, for another 10 minutes to steam. Do not lift the lid during this time.
Step 2: Crafting the Legendary Glossy Teriyaki Glaze
While the rice cooks, combine the soy sauce, mirin, sake (if using), brown sugar, minced ginger, and minced garlic in your small saucepan. Whisk everything together and bring it to a gentle simmer over medium heat. Let it bubble for 2-3 minutes for the flavors to meld. In a separate small bowl, whisk the cornstarch and cold water together until no lumps remain. Slowly pour the cornstarch slurry into the simmering sauce, whisking constantly. You’ll feel it thicken almost immediately. Let it simmer for one more minute until it’s thick, glossy, and coats the back of a spoon. Set it aside.
Step 3: Searing the Chicken to Golden Perfection
Pat your chicken pieces completely dry with a paper towel; this is critical for a good sear. Season them generously with salt and pepper. Heat the oil in your large skillet over medium-high heat. You’ll know it’s ready when the oil shimmers slightly. Carefully add the chicken in a single layer, ensuring not to overcrowd the pan (work in batches if needed). Sear for 3-4 minutes per side without moving it. Look for a deep golden-brown crust to form before flipping. Cook until the chicken is no longer pink inside and reaches an internal temperature of 165°F (74°C).
Step 4: The Final Combination and Assembly
Reduce the skillet heat to low and pour about two-thirds of your prepared teriyaki glaze over the seared chicken. Stir gently to coat every single piece. Watch as the glaze bubbles and clings to the chicken, creating that signature glistening look. While the chicken is glazing, lightly steam your broccoli florets for 2-3 minutes until they turn a vibrant green but are still crisp. Now, assemble your bowls. Fluff the steamed rice with a fork and create a bed in each bowl. Top with a generous mound of the glazed teriyaki chicken, arrange the steamed broccoli alongside it, and garnish lavishly with toasted sesame seeds and finely chopped green onions.
Chef’s Secrets for an Unforgettable Bowl
- Don’t Skip Rinsing the Rice: This simple step is the number one secret to achieving fluffy, distinct grains instead of a sticky, clumpy mess.
- Dry Chicken is Key: A dry surface is essential for creating a proper sear (Maillard reaction), which develops deep flavor and color. A wet chicken will simply steam in the pan.
- Control Your Glaze Thickness: If your glaze gets too thick, you can whisk in a tablespoon of water to thin it out. If it’s too thin, let it simmer for another minute to reduce further.
- Toast Your Sesame Seeds: Never use raw sesame seeds for garnish. Toasting them in a dry skillet for 2-3 minutes over medium heat unlocks a nutty, rich flavor that makes a huge difference.
How to Store and Reheat Your Teriyaki Creation
This Teriyaki Chicken Bowl is fantastic for leftovers and meal prep. To store, allow all components to cool completely and then place them in an airtight container in the refrigerator for up to 4 days. For best results, store the components separately if possible to maintain their textures.
To reheat, you can microwave the bowl in 60-second intervals until heated through. Alternatively, you can gently reheat the chicken and sauce in a skillet over low heat, and steam the rice and broccoli separately before combining.
Perfect Pairings: What to Serve With Your Bowl
While this Teriyaki Chicken Bowl is a perfectly satisfying meal on its own, it also pairs wonderfully with other dishes. If you are a fan of these classic Japanese-inspired flavors, you will absolutely love our quick teriyaki chicken stir fry (coming soon), which incorporates more delicious vegetables into the mix. For those who prefer noodles, this flavor profile works beautifully in our authentic yaki udon recipe (coming soon).
And for a surprisingly delightful and crunchy contrast, consider serving a crisp side salad. A fresh, crunchy slaw like this cowboy cabbage salad (coming soon) offers a fantastic textural counterpoint to the soft rice and tender chicken.
Your Teriyaki Questions, Answered
Absolutely! Chicken thighs are a great choice as they are very flavorful and stay juicy. The cooking time may be slightly longer, so ensure they are cooked through to an internal temperature of 165°F (74°C).
The secret is a cornstarch slurry. Mix equal parts cornstarch and cold water, then whisk it into the simmering sauce. It will thicken into a beautiful, glossy glaze in just a minute or two.
Yes, it’s perfect for meal prep. Store the rice, chicken, and broccoli in separate airtight containers in the refrigerator for up to 4 days. You can also store the sauce separately and drizzle it on after reheating for the best texture.
An authentic Japanese teriyaki sauce is a simple, elegant balance of four main ingredients: soy sauce, sake, mirin, and sugar. Our recipe builds on this classic base with fresh ginger and garlic for an extra layer of flavor.
Printable Recipe for the Perfect Teriyaki Chicken Bowl
The Ultimate Teriyaki Chicken Bowl: A Better-Than-Takeout Recipe
Ingredients
Equipment
Method
- Rinse rice under cold water until it runs clear. Add rice and 3 cups (720ml) of water to a medium pot. Bring to a boil, then reduce heat to low, cover, and simmer for 15 minutes. Turn off heat and let stand, covered, for 10 more minutes.
- In a small saucepan, whisk together soy sauce, mirin, sake (if using), brown sugar, ginger, and garlic. Bring to a simmer over medium heat for 2-3 minutes. In a small bowl, whisk cornstarch and cold water into a slurry. Slowly pour slurry into the sauce, whisking constantly until it thickens, about 1 minute. Set aside.
- Pat chicken pieces dry and season with salt and pepper. Heat oil in a large skillet over medium-high heat. Add chicken in a single layer and sear for 3-4 minutes per side, until golden brown and cooked through (165°F / 74°C).
- Reduce heat to low, pour about two-thirds of the teriyaki glaze over the chicken, and stir to coat completely.
- While chicken glazes, lightly steam broccoli florets for 2-3 minutes until bright green and tender-crisp.
- Assemble the bowls: Start with a bed of fluffy rice, top with the glazed chicken and steamed broccoli. Garnish with toasted sesame seeds and chopped green onions. Serve immediately.
Notes
Dry Chicken is Key: Patting the chicken dry ensures a beautiful golden-brown sear.
Control Your Glaze Thickness: If it's too thick, add a little water. If too thin, simmer a bit longer.
Toast Your Sesame Seeds: This unlocks a wonderfully nutty aroma and flavor that elevates the dish.

Share Your Culinary Masterpiece!
Now that you have the ultimate recipe for a homemade Teriyaki Chicken Bowl, it’s your turn to create this masterpiece. We know you’ll love the incredible flavors and how easy it is to bring together.
We’d love to see your creations! Leave a comment below to let us know how it turned out, and don’t forget to share this recipe with your friends and family on Pinterest. Your next favorite weeknight dinner is just a bowl away!